Showing posts with label hand pieced quilt along. Show all posts

Friday, October 26, 2012

Hand Pieced Quilt Finished!!!!


I appreciate the comments you left on yesterdays post. They were very comforting. I am so grateful for all of the friendships I've made through quilting and blogging.
Today I have less words and more pictures! I finished my hand pieced quilt. I am so happy with it. I keep staring at it. Picking it up, putting in down and picking it up. I love it!!! I had no idea when I ventured into hand piecing that I would get so much satisfaction from doing so. I NEVER thought I'd have the patience for hand piecing. But I enjoyed every block, every stitch. I never rushed anything while making this quilt. I guess that's why this little thing took 10 months to make :) It's a really good feeling knowing that a machine never touched it. Well, except the iron. It also fit in so perfectly with our move and being with out of electric for weeks, getting electric back and losing it again for 2 weeks. Ma Ingalls I am not, but at least I  know I can live without electric, if I had to, and still make really pretty quilts.

P.S. I ♥ electric and running water and every time it storms I pray we don't lose it like we did this summer!!!

I hope you have a happy weekend!


Tuesday, October 23, 2012

Hand Pieced Quilt-A-Long ~ Binding

Well we've finally made it to the last part of the hand pieced quilt along. Thanks for sticking with me all these months. It was a very slow quilt along and I've enjoyed it so much. I loved seeing everyone's blocks in the flickr group and I am really looking forward to seeing more finished hand pieced quilts.

Today I'll show you how I make and attach the binding to a quilt by hand.

I was able to use 4 strips 2.5 inches by the width of fabric (WOF) to bind my quilt. Double check to make sure this will be enough for your quilt.

I mark a 1/4 inch line on each end of my strips.

Then I mark a 1/4 inch line on the RIGHT (meaning printed) side of the all of the strips of fabric along one long edge.

Sew your ends together to make 1 long strip. If using 4 strips you will have 3 seams. Press your seams open and fold your long strip in half length wise. Now some (most?) people press their binding strip in half at this point. I no longer press my binding as I find I don't like sewing into the crease. I simply fold and start attaching the binding to the quilt.


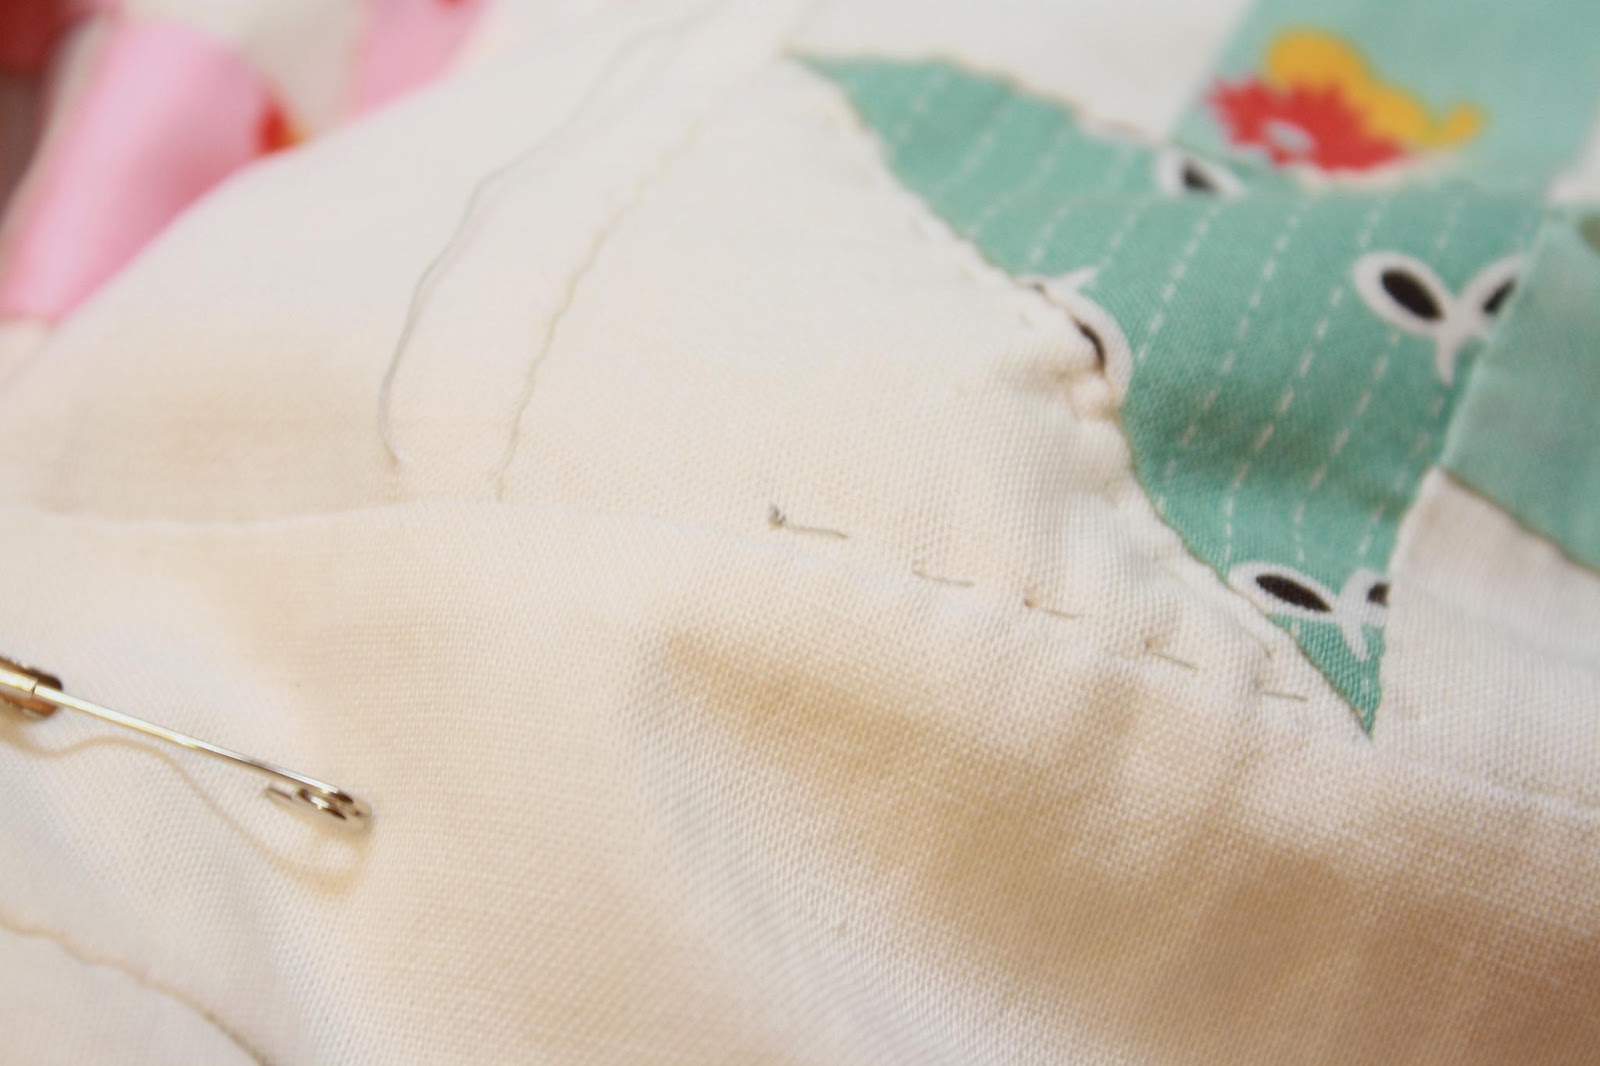
I take my binding and find the halfway point on the bottom front of my quilt in this case underneath the green Ohio Star block. Pin the binding to the front with all raw edges of the quilt and binding lined up together. Give your self about 6 inches and use another pin to mark where you are going to actually begin sewing on the binding. Start sewing at the second pin.

I use a running stitch to attach the binding to the front of the quilt. You will be going through multiple layers here so you may not be able to get as many stitches on your needle at one time. Use a pin to mark 1/4 inch away from the corner's edge. Sew a few stitches perpendicular to your running stitch line along your pin to the bottom edge. I use a back stitch for this part. This is for your mitered corners.

Now fold your binding up, perpendicular to the binding that is already attached. Hold that in place.

Fold the binding back down on top of the fold you just made. Making sure your your folded edge matches up with the raw edge and everything is nice and tidy.

I take several back stitches here as I start from the corner. Again there are several layers ans you want a nice strong stitch.

Your corner should look something like this when you fold your binding to the back of the quilt.

Continue to sew the binding onto the quilt top mitering all of your corners as you go. Stopping about 6 inches from the bottom center (green Ohio Star block on my quilt). Trim your extra binding so that it lays 1/2 inch over or on top of the beginning of your binding strip.


Sew the ends together. There won't be a 1/4 inch mark on the piece you trimmed use the marking on the beginning of the binding strip.

Press the seam open. Fold again and continue to sew on the binding.

Now your ready to sew the binding down to the back of the quilt. There are a blue million tutorials on this subject. So instead of adding another one of the same I'll give you a link to the method I use. I used to use a whip stitch to do this but a couple of years ago I found a tutorial by Amy @ Amy's Creative Side and I absolutely love it! Your stitches are invisible and it looks so clean and sharp.

Amy's tutorial to attach the binding to the back of your quilt using a ladder stitch is great. Check it out.

That's it!!! After you attach the binding to the back you are done!!! Wash gently, dry, crinkle and enjoy!!!

I finished mine yesterday. I am in love. I'll be posting pictures this week.

Thanks again to all of you who joined me. I was new to hand piecing and hand quilting when I started this. I'm glad I didn't let my fear of not knowing what I was doing stop me. I've learned a lot about sewing through this quilt along and I felt such a sense of accomplishment finishing my quilt even though it was a smaller one. I admire the ladies who make big quilts completely by hand. I hope to do that myself one day.

Below are the links to all of the quilt along posts!!! I hope that the info is helpful to someone out there :)


Block #1 ~ Churn Dash

Block #2 ~ Jacob's Ladder

Block #3 ~ Ohio Star

Block #4 ~ Bear Paw

Block #5 ~ Granny Square

Block #6 ~ Shoo-Fly

Block #7 ~ Card Trick

Block #8 ~ Friendship Star 

Block #9 ~ Square in a Square

Block #10 ~ Log Cabin

Block #11 ~ Flying Geese Pinwheel

Block #12 ~ Honey Bee

Sashing and Borders

Quilting

The flickr group is here. Come on over and see all the other pretty hand pieced blocks and quilts.


Friday, August 17, 2012

Hand Pieced Quilt-A-Long ~ Hand Quilting

~ Before I start I want to say a HUGE thank you for all of the sweet congratulations about my baby news. Your comments really touched me and lifted my mood. I appreciate them more than you know. So thank you! ~

For those of you doing the hand pieced quilt along with me, I bet you never thought I was going to get to this. A few posts ago I said the next post would be about hand quilting the quilt. I apologize for dragging my feet. The truth is I feel a bit inadequate giving hand quilting instructions. But I will show you what I do and if it is not helpful I'm sure there are much better tutorials around.
A few years ago another (experienced) quilter told me to use needles called betweens or quilter's betweens for hand quilting. I just used any ol' needle I had on hand (still do most times) and they would start to curve after hand quilting for a bit and they would become hard to grip and keep straight. The betweens won't bend after lots of hand quilting, or at least not as much anyway.

When I first started quilting I read a lot of old quilting books. I read repeatedly that for hand quilting the quilt should be basted using thread and long running stitches. I have used this method and don't like it. As I don't use any hoop or frame to hand quilt I have no problems pin basting.

Shall we start? Cut a length of thread about 18 inches. Thread your needle leaving one loose end. Knot your thread at the other end. Insert your needle into the quilt top and into the batting but not the backing fabric about an inch or 2 from where you want to make your first stitch. Bring the needle up at the beginning of your quilting line. I am just outline quilting here.

Give the thread a little tug and pull the knot through the quilt top and bury it in the batting.

Take a few uneven, messy stitches. Just kidding. I like to call them organic. Just kidding. Again.

Quilt in this manner until you come to the end of the area you are quilting or your thread is getting short. Then wrap the thread around your needle twice. Insert the needle where you would make your last or next stitch and pull the needle through the quilt top and into the batting but not through the backing fabric.

Bring your needle up an inch or 2 away and pop the knot through the quilt top.

Bury the knot in the batting. Carefully snip your thread. That's how I do it. If you have any tips, suggestions, words of wisdom on hand quilting please let me know. 

Here are the links for all of the hand pieced blocks:


Block #1 ~ Churn Dash

Block #2 ~ Jacob's Ladder

Block #3 ~ Ohio Star

Block #4 ~ Bear Paw

Block #5 ~ Granny Square

Block #6 ~ Shoo-Fly

Block #7 ~ Card Trick

Block #8 ~ Friendship Star 

Block #9 ~ Square in a Square

Block #10 ~ Log Cabin

Block #11 ~ Flying Geese Pinwheel

Block #12 ~ Honey Bee


The flickr group is here. Come on over and see all the other pretty hand pieced blocks.


Have a great weekend!!!


Friday, April 13, 2012

Hand Pieced Quilt-A-Long Block #12 ~ Honey Bee

Well this is the last block for the hand pieced quilt along. I decided on one of my very, very favorite blocks (don't I say that every week?), Honey Bee! It combines piecing and applique. A great skill builder.

For this block (6 inch) you will need:
4 ~ 2 in. squares (corners, print)
4 ~ 2 x 3.5 in. rectangles (sides, background)
4 ~ 1.5 in. squares (print, inner nine patch squares, mine are yellow)
5 ~ 1.5 in. squares (print, outer nine patch squares, mine are blue)
12 ~ honey bee / tear drop shaped pieces (print, mine are yellow)
freezer paper or regular paper
Honey Bee applique template here
(I printed this out and it is a bit smaller than what I drew so you may have to play with the size a bit or feel free to draw your own.)
or you can save the image here and adjust it to fit the quilt pieces.


I'll start with the applique pieces. First trace the template onto your freezer paper. Cut out the pieces. Iron them onto the back of the fabric. 

Trim 1/4 in. away from the template. 

Fold the center of the pointed end in first. (please excuse my sick little cutting board. It is far beyond self healing and I am in need of a new one)

Then fold each side in to make a nice point. Thread a needle and insert it into the point 

and fold your fabric over the template the whole way around using a basting stitch. Make 12 of these.

**Note that I assemble my whole block before I sew my applique pieces down. That way you can see that everything is placed exactly how you want it and not going to get sewn into the seam allowance. I am just showing you rather quickly for the sake of time. You can use matching thread and make your stitches look much nicer than I did here.

With my applique piece in place, on top of the piece of fabric it is being appliqued to, I bring my needle up from underneath of my fabric just catching the applique piece and go back into the fabric right at the edge of the applique piece.

Continue sewing down your applique piece this way leaving about 1/2 to 3/4 of an inch open. Take out your basting thread.

Remove the paper.

Use your needle to turn the seam allowance under and continue sewing in the same manner you did before until your applique piece is completely sewn down.

To assemble block see picture. It is the cutest block and I can't wait to see the 6 inch version when I finish it. 

Here are the links to Blocks 1~11:

Block #1 ~ Churn Dash
Block #9 ~ Square in a Square


Come join us over at the hand pieced flickr group!


Next week we will go over assembling the quilt top!!! Have a great weekend!

Friday, April 6, 2012

Hand Pieced Quilt-A-Long Block #11 ~ Flying Geese Pinwheel

I asked Jacque if she had any suggestions for this week's block and she suggested a pinwheel. I thought that was a brilliant suggestion and I really love pinwheels. I chose a Flying Geese Pinwheel because I get many compliments and questions about my Flying Geese Pinwheel quilts. There are a few speed piecing methods for Flying Geese units but I think they are more geared towards machine piecing. So for this block we will use the traditional method of piecing flying geese.

For the block you will need:
1 ~ 4 1/4 inch square for the geese (print)
4 ~ 2 3/8 inch square for the sky (background)
4 ~ 2 x 3 1/2 inch rectangles (background)

Mark a line on each diagonal of the 4 1/4 in. print square. Mark your sewing / seam allowance lines also.

Mark a diagonal line on the 2 3/8 in. background squares, 4 total. Mark your seam allownace, mark the seam allowance for the 2 x 3 1/2 in. rectangles too.

Sew your Flying Geese units together, 4 total.

Sew a 2 x 3 1/5 in. rectangle to the pointy end of your Flying Geese unit.

Layout your units in a pinwheel pattern. Sew your 4 units together. I like to sew left to right, top to bottom.

Here are all of my blocks so far...

Here are the links to Blocks 1~10:
Block #1 ~ Churn Dash
Block #2 ~ Jacob's Ladder
Block #3 ~ Ohio Star
Block #4 ~ Bear Paw
Block #5 ~ Granny Square
Block #6 ~ Shoo-Fly
Block #7 ~ Card Trick
Block #8 ~ Friendship Star 
Block #9 ~ Square in a Square
Block #10 ~ Log Cabin

Come join us over at the hand pieced flickr group!

I hope you all have a happy weekend :)


Friday, March 30, 2012

Hand Pieced Quilt-A-Long Block #10 ~ Log Cabin

So, I'm a little bummed this is our 10th block and we only have 2 more left. Where does the time go? I enjoy making these and I know I will continue with hand piecing after this. How about you?
This week's block is Log Cabin. Traditionally made with light values on one side and dark on the other with a red center block symbolizing the hearth of the home. I didn't follow the values rule but I did include the red center.I sewed mine ahead of time to make sure all the measurements were correct.

To make the block (6 inch finished) you will need:

1 ~ 1 1/2 in. square - block center ( I used red)

Light Value (I used blue)
1 ~ 1 1/8 x 1 1/2 in.
1 ~ 1 1/8 x 2 1/8 in.
1 ~ 1 1/8 x 2 3/4 in.
1 ~ 1 1/8 x 3 3/8 in.
1 ~ 1 1/8 x 4 in.
1 ~ 1 1/8 x 4 5/8 in.
1 ~ 1 1/8 x 5 1/4 in.
1 ~ 1 1/8 x 5 7/8 in.

Dark Value ( I used pink)
1 ~ 1 1/8 x 2 1/8 in.
1 ~ 1 1/8 x 2 3/4 in.
1 ~ 1 1/8 x 3 3/8 in.
1 ~ 1 1/8 x 4 in.
1 ~ 1 1/8 x 4 5/8 in.
1 ~ 1 1/8 x 5 1/4 in.
1 ~ 1 1/8 x 5 7/8 in.
1 ~ 1 1/8 x 6 1/2 in. 

(click to enlarge)
Sew your pieces together clockwise starting with the light (blue) 1 1/8 x 1 1/2 in. to the center. See picture for order.

Here is my block from last week.

Here are all of my blocks together.

and one for good measure including this week's block. Someone must have thought it needed a little something extra :)

Here are the links for blocks #1-9:


Block #1 ~ Churn Dash
Block #2 ~ Jacob's Ladder
Block #3 ~ Ohio Star
Block #4 ~ Bear Paw
Block #5 ~ Granny Square
Block #6 ~ Shoo-Fly
Block #7 ~ Card Trick
Block #8 ~ Friendship Star 
Block #9 ~ Square in a Square


As always, if you want to join, in all are welcome at anytime! Here is our flickr group! I love all the blocks that are being added to the group pool! They look great. I'm looking forward to seeing more.

Have a great weekend!

>

LinkWithin

Related Posts Plugin for WordPress, Blogger...