Pages

Friday, December 18, 2009

And the Winner is ...

True Random Number Generator 1 29 17 Powered by RANDOM.ORG

# 17 -
Mountain Home Quilts


Thanks to everyone for joining in. I always enjoy having give aways. I look forward to having more of them. Take care!

Thursday, December 17, 2009

Doll Quilt with Pillow and Another Fabric BAsket


I made a doll quilt and pillow from this tutorial. I have made lots of doll quilts and they can be any size but I think this tutorial is really nice because of the cute little pillow case instructions. I did add an accent band between the two main fabrics.


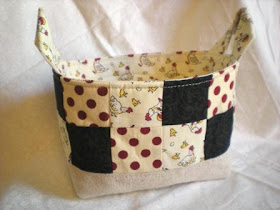
I made another fabric basket. Tutorial here. It's the same as the other Sweet one I made only the handles are from different fabric. The quilt and pillow fit perfectly inside the basket. I'm excited to give this one away. I hope the recipient likes it!


* If you are looking for the FQ give away it is one post down *

Wednesday, December 16, 2009

Just a Little Give Away...

Because I won these earrings over at an Artful Life, I thought I'd have a little celebration give away.

I am going to give away these 3 FQ's from the Urban Chicks Sweet line for Moda. This is one of my favorite fabric lines and I love the paisleys. Hope you do too! If you want to enter leave a comment! Just a hey or hi is fine. I'll announce a winner Friday morning.

Monday, December 14, 2009

Easy Peasy Lemon Squeezy


So with the making of Christmas gifts and my adventure in miniature paper piecing (will post about that another time), I decided to just take some time and make some really fun blocks.

This is the same method I used for the runner in this post. It's honestly the best time I've had piecing. It's so EASY and all the blocks are different.

This is what I do.
I cut 2 inch strips.
Start with a 2 inch square in the center and work clockwise log cabin "style".
I don't worry about lights and darks etc. Just piece it the way you like it! I could make tons of these and it is just so relaxing.


I think these will look great with white sashing. I want to make more though because I haven't made a big one in a while. So I think I'm going to aim for twin or queen size.

I also am going to rip the seams out of this project and go this route with it. It's so much fun. That's what quilting is about for me anyway! Enjoying it!

* Stay tuned, I will be having a give away within the next day or two in celebration of winning this giveaway over at An artful Life. I am so excited. I can't wait to receive those beautiful green earrings.

Friday, December 11, 2009

Making Progress on Handmade Christmas Gifts

I'm making some progress on the Christmas list I have of handmade goodies. I made four fabric baskets and I plan on making a few more. I made 2 back in May and gave one away for the Sew Mama Sew May Give away. They are adorable and I think they make great gifts.

The tutorial is here.

I made this one longer than the pattern calls. I think this would be a good size for a bread basket.

The next one is the size stated in the pattern. I used some of my Sweet stash. I love these peeps!


Another pic, can you tell I love this one! This is for a sweetie, someone very special♥

This one is Spideyman inspired! for another someone very special♥


And this one is for my mom. She loves chickens. So I thought this would be cute. These are so fun and easy to make and they are a million times cuter in real life!


I also made my mom a checkbook cover. I made one for myself last year and she has been commenting on it since. So I got around to that also. I hope she likes it. Note more chickens!


The tutorial for this project is here.

I also finished a top for a table runner, again for my mom, I'll show that when I have it quilted. I have also been making lots of nine patches for her quilt. I'm not sure that's gonna be finished for Christmas, but I do work well under pressure so I'm gonna try.

Thanks for stopping by!

Friday, December 4, 2009

A Small Finish and a Recovered Ironing Table

I've been working on Christmas gifts lately. I made a throw size quilt for my MIL and when I washed it the red fabric bled into the white sashing. I was so disappointed. I pre-wash all my fabric and I have never had this problem before. I decided to use it under the Christmas tree so I guess it wasn't a complete waste.

I did finish this table runner. I am really happy with it. I think it's so cute. I'll have to make one for myself sometime.


I also recovered my ironing table. Yes, I don't have an ironing board. I don't iron much (except fabric). Is that bad? But I like the recover job, very simple. I was using this. Yup, just a towel on padding on a wooden TV try. Nice, right? But my towel kept coming up on the sides when I was pressing strips.


So I recovered the table with multiple layers of batting and some fabric from my stash. I made a casing around the perimeter of the fabric and ran elastic through it. Voila!

No more shifting underneath when I press my fabric. I'm happy. I do like my tray because it's portable and it sits right next to me as I piece.

I also like my Rowenta iron. I was in desperate need of an iron (mine was spitting out rust). When I was at my local thrift shop I spotted this baby for $3 bucks! I was super jazzed. It was like new. It works great. I'll have to post sometime about my awesome Craig's List Pfaff. Another time.

Thursday, November 5, 2009

Sewing Roll

I made a couple of these sewing rolls yesterday.

I love the way they turned out. I think they would make perfect little Christmas gifts.


Tuesday, November 3, 2009

Park City Girl's Family Recipe Swap


Amy Over at Park City Girl Is having a recipe swap. I love this idea because I have lost my cooking mojo. Meatloaf and mashies are not thrilling me lately. So here's my contribution:

Chicken Roll-Ups

Chicken Breast ( 1 breast per serving)Ham (sliced thin or chipped from the deli)
Sharp Cheddar (block, not shredded) or cheese of your liking (sliced thin)
Bread or cracker crumbs (Ritz Garden Vegetable are good)
Butter (melted)
Toothpicks

Start by pounding out your chicken breast between 2 sheets of plastic wrap or parchment paper. Lay down a few (thin) slices of ham on top of your chicken breast. Then add a layer of cheese. Roll the breast up. Dip it in melted butter. Roll in bread crumbs. Stick a toothpick or 2 through the middle of the roll. Put in a baking dish and bake uncovered @ 350 for 35-40 minutes depending on your oven.
I usually serve this with baked potatoes and broccoli.


(this is not my picture, this yummy Chicken Cordon Bleu is made by Tyler Florence on Food Network)

Sunday, November 1, 2009

Tea Staining (the way I do it)....

Thought I'd show you how I tea stain my fabric. Super simple.

I am going to start working on a quilt using reproduction fabrics. I promised myself that I am not buying anymore fabric until I use some of what I have. (not sure what the definition of some is yet!LOL) I couldn't find any background fabric I liked in my stash.


It was all too light for the fabrics I am working with so I decided to tea stain some. Here is how I do it:


Put the fabric in a big bowl. I used a big Pyrex mixing bowl. This is 2 yards of pre-washed ( I pre-wash everything) cotton fabric. Then make a strong batch of tea.


I also added vinegar and some salt to mine. Don't really know if it does anything to help set the tea but it seems like something my aunt would have done so I just do it. After the tea steeps and is as dark as you'd like it, pour it over your material. To cover or close to it.


I then let it soak and turn the fabric a few times in the bowl every few minutes. Then when it's the color I want it

(*it will lighten up as it dries) I put it into the washer on the spin cycle (no rinse). Then I throw it in the dryer and Voila! The tea stained fabric is on the bottom and the original is on the top.

It's subtle but just enough to work well with my other fabric. You can make it darker by making a stronger brew, adding instant coffee or letting it soak longer. You can also use different kinds of teas. The possibilities are endless.

I really like to tea stain neutral homespun material. It just grabs the tea and you get lots of great streaks and textures in your fabric. Here is my absolute favorite quilt. I made it in 2007.


Here is another made with tea stained homespun in the background. I like the lighter and darker streaks in this one. It's hard to see them, they are near the willow trees.


I made this one for Jacque. We did a swap this summer and we decided on a prim drab theme. I love how this turned out.

Again the background is all various tea stained pieces. I hope this was helpful to someone. I think it's a lot of fun and a great way to mute some of the bright colors that may be in your stash if it's mixed like mine.


Thursday, October 29, 2009

Sunday, October 25, 2009

Mushrooms...In Progress


I'm trying to finish up my wip's .

This one is from June. I love this mushroom fabric. It's Woodland Wonderland by Jay McCarroll for Free Spirit


I love the fabric but not sure where I am going with it yet.


(very wrinkled from sitting in the closet for 4 months)

I'm just doing some random piecing, no pattern. We'll see how it turns out!

Wednesday, October 21, 2009

Aqua and Red Pinwheels

I finished my aqua and red pinwheel baby quilt. I love it! I couldn't get the best pic this morning but it's okay.


Here's a shot of the six different color fabrics I used.


I decided to go with the red micro dots for the binding.


I more often than not sew my binding on completely with my machine and they don't always look so great. I usually only hand sew binding on if I am giving the quilt to someone else. I did sew this one down by hand. I am really going to try to commit to sewing all my bindings on by hand. They look so nice and I really don't mind doing it. It just takes so long when you have all these quilt ideas swirling around in your brain. But I am really going for better quality in my quilts over quantity.

Fabrics Used

darkest red
- Marbles by Moda
red micro dots - ? not sure, no selvages (tattered), found in the bargain room at LQS, really thick and nice though
red with whit flowers - Aunt Grace Scrap Bag by Judie Rothermel (Marcus Brothers)
darkest aqua - Linen Texture by P & B Textiles
aqua with flowers - Aunt Grace Classics by Judie Rothermel
lighter blue with red dots - Bubble Gum Basics by Barbara Jones (Henry Glass Fabrics)
white background fabric - something that was nice and thick from my stash (no selvage)

Monday, October 19, 2009

Strip Pieced Half Square Triangles and Flat Pinwheels

I'm in the process of making an aqua and red pinwheel baby quilt. I love pinwheels. The easiest way (for me) to make half square triangles is to strip piece them. Here's how I do it.

I cut my strips of fabric the finished size I want my HST ( half square triangles) to be plus 7/8 of an inch. (Example a 4 inch (finished) HST  Cut strip 4 7/8 in.)Cut that measurement by the WOF (width of fabric). Then you get this nice pile of strips.


Next mark off the measurement you are using for your HST in intervals on the back of your light strips. Then mark alternating diagonal lines between the straight lines.


Now line your light strip and alternating fabric strip right sides together and press them to hold them together.


Sew 1/4 of an inch away from the diagonal lines on one side of the strip.


When you come to the end of the strip turn it and sew along the diagonal lines on the other side.


Press to set your seems.


Now cut on the drawn lines (straight and diagonal).


Press to the darker fabric and square up as desired.


FLAT PINWHEELS
Now that you have your half square triangles you can make lots of things. I am making pinwheels. This is how I get a flat pinwheel. Pinwheels have a lot of bulk where all the seams intersect. So pressing is the important thing here.

First layout your HST's to make a pinwheel. Sew the top 2 together and then the bottom 2, butting seams.


PRESS THE SEAMS OPEN.


Now put your top unit and bottom unit together, matching all seams. Pin if you like.


Press your seams OPEN.


Square up. Now you should have a lovely flat pinwheel.